«Users» tab
Tab displays list of users and their attributes:

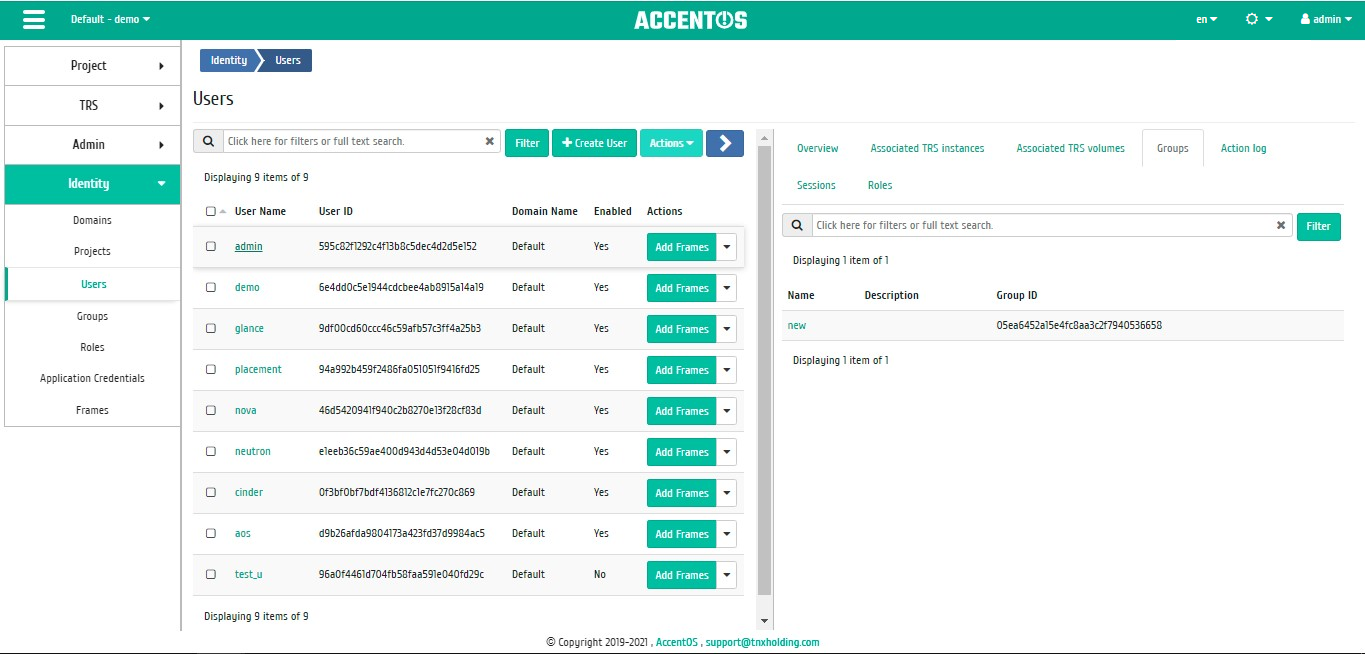
Users list
| Field name | Description |
|---|---|
| User Name | User Name, it is assigned at creation. It can also be changed in the general list and is a link to go to detailed information about specific user. |
| User ID | User ID, assigned automatically upon creation. |
| Domain name | Domain name. |
| Enabled | User state. |
Also, user can view detailed information about the user. Detailed information about the object opens in a separate block on the right side of the page when you click on the username link. This does not close the list of objects and is displayed on the left side of the page. To close block of detailed information use the  button, to open a block of detailed information use the button
  .
.
Detailed information about user is presented in several internal tabs.
«Overview» tab
Tab displays detailed information about the selected user:

Detailed user parameters
«Associated TRS instances» tab
Tab displays list of all TRS instances that are assigned to the user and to groups this user belongs to within the current domain:

User’s TRS instances list
Sorting and filtering tools are available for the list. Sorting is available for all fields. It is possible to sort the objects marked with a check mark. Filtration is performed according to following parameters:
- Name is TRS instance name;
- Project is TRS instance project;
- IP address is IP address of the instance;
- Size is flavor of TRS instance;
- Status is instance status;
- Availability zone of instance;
- Task is task name of the TRS instance;
- Power is power status of the TRS instance;
- Operation mode is TRS instance operating mode;
- Instance ID is instance identifier, it is specified in the tab with detailed information.
Unassignment is available for the list of associated TRS instances. Also, this action can be performed on the group of TRS instances.
Note
Unassigning is possible only for TRS instances directly assigned to this user. This action is not available for instances assigned to user group.
«Associated TRS volumes» tab
Tab displays list of TRS volumes that are assigned to user:

User’s TRS volumes list
Sorting and filtering tools are available for the list. Sorting is available for all fields. It is possible to sort the objects marked with a check mark. Filtration is performed according to following parameters:
- Project is name of the TRS project that owns the volume. Incomplete name entry is possible;
- Name is the name of the volume. Incomplete name entry is possible;
- Description is the description of the volume. Incomplete name entry is possible;
- Size is the amount of volume resources. Incomplete name entry is possible;
- Status is volume state. Incomplete name entry is possible;
- Type is type of volume. Incomplete name entry is possible;
- Attached To, information about the instance and the mount point to which this volume is connected. Incomplete name entry is possible;
- Assigned is indication that TRS volume is assigned to user. Incomplete name entry is possible;
- Bootable is indication that the volume can be used when starting instance. Incomplete name entry is possible;
- Encrypted is indication that volume is encrypted. Incomplete name entry is possible;
- Minimum Size (GiB) is minimum value for volume size. Incomplete name entry is possible;
- Maximum Size (GiB) is maximum value for volume size. Incomplete name entry is possible.
Unassignment is available for the list of associated TRS volumes. Also, this action can be performed on the group of TRS volumes.
«Groups» tab
Tab displays list of groups to which the current user belongs:
User’s group list
Sorting and filtering tools are available for the list of user groups. Sorting is available for all fields. It is possible to sort the objects marked with a check mark. Filtering tool works by the name of any of the fields, incomplete input of the name is allowed.
Note
User with administrator rights has access to all groups. For user with the user role, only his groups will be available.
«Action log» tab
Tab displays the history of user actions, including launch database purging utility:

User’s action log
| Field name | Description |
|---|---|
| Request ID | Request identifier. |
| Parent request | Identifier of the request, which is the parent of this one, for example, if an action was performed on a request from RSclient or Scheduler. If the action is performed on request from the Dashboard, then there is no parent request. |
| Action | Action name. |
| Start time | Date and time of the task start in the format: dd.mm.yyyy, hh.mm.ss. |
| Subject type | Type of object on which the action was performed. |
| Subject name | Name of object on which the action was performed. |
| Result | Result of the action. Possible values are:
|
| Result details | Detailed description of the result. Also, if the action was performed during the execution of scheduled task, the task identifier is indicated. |
Sorting and filtering tools are available for journal. Fields are sorted in ascending and descending order. Filtering tool works on all fields.
«Sessions» tab
Tab displays detailed information about user’s connections to TRS instances:

List of user’s connections
Sorting and filtering tools are available for the list. Sorting is available for all fields. It is possible to sort the objects marked with a check mark. Filtering tool works by the name of any of the fields.
«Roles» tab
Tab displays all projects and domains in which the user is a member, both separately and as part of user group:

List of projects and user domains
Sorting and filtering tools are available for the list. Sorting is available for all fields. It is possible to sort the objects marked with a check mark. Filtering tool works by the name of any of the fields.
| N | Action | Description |
|---|---|---|
| 1 | Create user | Add new user with specified access rights. |
| 2 | Add frames | Manage user frames. This action is available only for user with domain administrator rights. |
| 3 | Add two-factor authentication | Add user two-factor authentication. |
| 4 | Disable user | Deactivating the selected user. Action is available only for active users. Action cannot be applied to the user who was logged in. |
| 5 | Edit | Changing name, phone, email and main project of the user. |
| 6 | Change password | Password changing. Action can only be applied to the user under which the system was logged in. |
| 7 | Enable user | Activation of the selected user. Action is available only for inactive users. |
| 8 | Delete user | Deleting the selected user. Action cannot be applied to the user who was logged on to the system, as well as for users to whom TRS instances are assigned. |
| 9 | Unassign | Deleting the bind of user and TRS instance. |
| 10 | Remove two-factor authentication | Deleting two-factor authentication for user. Action is available only for users configured with two-factor authentication. |
| 11 | IP address management | Managing user’s floating IPs. |
Features of work
User creation
In the general list on the control panel using the “Create user” button, open the creating wizard window:

User creation window
In the window that opens, indicate:
- User name is an optional field, if the value is empty, name is generated automatically;
- Description is brief information about the user;
- Phone number is the user’s phone number in the format +7 (###) ###-##-##;
- Email is user’s email address;
- Password is combination of numbers and letters to protect and authenticate the user;
- Confirm password is field for confirming the previously entered combination;
- Primary project is user’s working project;
- Role is assigning user rights;
- «Enabled» flag is user state after creation.
Note
The user’s phone number and email address can be used to obtain verification code if two-factor authentication is set up.
Follow the directions on the pages of the wizard window to select the options you want. We complete the creation procedure with the «Create User» button. After that, the correctly created user will be displayed in the general list. Otherwise, the system will return you to the wizard window indicating the reasons for the impossibility of its creation.
Adding frame
Function is available in the general list of all users. After calling the action, select required frames:

User frame management window
Confirm your choice with the «Save» button.
User changing
Function is available in the action list of the required project. Allows you to modify user details including primary project.

Window for changing user parameters
In the window that opens, select required parameters. Complete the procedure with the «Update User» button.
User password changing
Function is available in the list of actions of the required user.

User password changing window
In the window that opens, enter new password and confirm it. Complete the procedure with the «Save» button.
Disabling user
Function is available in the general list of all users. After calling the action «Disable user» the selected user is blocked and displayed with the status «Disabled»:

User with «Disabled» status
Enabling user
Enabling deactivated user is available in the general list of all users. Select the user you need to unlock and call the «Enable user» action.
After unlocking, the user will be displayed with the «Enabled» status:

User with «Enabled» status
Unassigning TRS instance
Function allows to unassign the TRS instance user. Function is available only in the internal tab “Associated TRS instances”.
It is performed after the required instance has been selected using the «Unassign» action. Action is also available for group of instances.
IP address management
Important
- Function is only available for the project administrator;
- Only one floating IP address can be bound to one user;
- Specific floating IP address can only be associated with one user;
- The first time the user connects, the local IP address of the instance will be returned based on the connected project network, and when the user reconnects, the floating IP address will be returned.
Function allows to manage the user’s bound with the floating IP-addresses of given project. It is available in the general list. After calling action in the window that opens, select the required IP address:

Floating IPs manage window
Required IP-address is connected using the button «↑». To disable use the button «↓». Complete procedure with the confirmation button.
Note
Floating IPs management form displays all floating IPs in the project, including those that are already connected to other users. If you try to connect an IP address that is already connected to another user, warning message window will appear, which also allows you to disconnect the floating IP address from the previous user and reconnect to a new one.
Adding two-factor authentication
Important
This action is available only for the domain administrator. Action is available only if the totp method is enabled in the keystone.conf configuration file.
This feature allows to add two-factor authentication for users. After confirming the addition of two-factor authentication, window with secret code and QR code opens.

Two-factor authentication secret code window
If you plan to use third-party applications to generate verification codes (for example Google Authenticator), you must save the provided secret code or scan the QR code in the corresponding application. To generate secret codes for the user, as well as verification codes, the TOTP technology is used.
Removing two-factor authentication
Important
Action is available only if the totp method is enabled in the keystone.conf configuration file.
This feature allows you to remove two-factor authentication for users to whom it has been added.

Window with confirmation of removal of two-factor authentication
Deleting user
Deleting is available for one or group of users. Select required objects and call the action «Delete users»:

User deletion confirmation window
After confirmation, users will be deleted and unbound from all assigned objects.