«TRS projects» tab
Important
Calculation of number of instances in the project takes into account only instances of TRS type.
Tab displays list of TRS projects:

List of TRS projects
| Field name | Description |
|---|---|
| Name | TRS project name, assigned by the user upon creation. |
| Enabled | TRS project status. It changes in the general list of all projects. |
| Operation Mode | TRS project mode of operation, it is set only when it is created, without possibility of its subsequent modification. Possible values are:
|
| Launch Possible | Parameter that displays whether TRS instances can be launched in this project. Possible values are:
|
Sorting and filtering tools are available for the list of TRS projects. Sorting is available for all fields. It is possible to sort the objects marked with a check mark. Filtration is performed according to following parameters:
- Name is TRS project name. Incomplete input is allowed;
- Description is TRS project description. Incomplete input is allowed;
- Domain Name is name of project domain. Incomplete input is allowed;
- Enabled is TRS project status. Incomplete input is allowed;
- Operation Mode is the mode of operation of the project. Incomplete input is allowed;
- Operation Mode is TRS project mode of operation. Incomplete input is allowed;
- Launch Possible is parameter that displays whether TRS instances can be launched in this project.
Also, user can view detailed information about TRS project. Detailed information about the object opens in separate block on the right side of the page when you click on TRS project name link. This does not close the list of objects and is displayed on the left side of the page. To close block of detailed information use the  button, to open a block of detailed information use the button
  .
.
«Overview» tab
Tab displays detailed information about selected TRS project:

Detailed parameters of TRS project
Including, the tab displays total number of project resources (quotas), as well as the number of resources used.
Tab also provides data on service level (SLA) of TRS project:
- Up time (%);
- Recovery time (hours);
- Movable is parameter indicating whether the transfer of project resources from one compute node to another is allowed or prohibited during the balancing process. By default, transfer is allowed.
«Usage» tab
Tab displays instances, which are currently using TRS project resources:

TRS project resource usage statistics
Data is displayed at the time of entering the module and to view information for the previous period of time, use the selection of the required date. In addition, you can get text document with report on resource consumption in CSV format.
Sorting tool is available for all displayed fields. Fields are sorted in ascending and descending order.
«Action log» tab
Tab displays information about history of operations with TRS project and project instances:

TRS project action log
| Field name | Description |
|---|---|
| Request ID | Request identifier. |
| Parent request | Identifier of the request, which is the parent of this one, for example, if an action was performed on a request from RSclient or Scheduler. If the action is performed on request from the Dashboard, then there is no parent request. |
| Action | Action name. |
| Start time | Date and time of the task start in the format: dd.mm.yyyy, hh.mm.ss. |
| User | Name of the user who initiated the action. |
| Subject type | Type of object on which the action was performed. |
| Subject name | Name of object on which the action was performed. |
| Result | Result of the action. Possible values are:
|
| Result details | Detailed description of the result. Also, if the action was performed during the execution of scheduled task, the task identifier is indicated. |
Sorting and filtering tools are available for journal. Fields are sorted in ascending and descending order. Filtering tool works on all fields.
«Scheduled tasks» tab
Tab displays list of scheduled tasks on TRS project:

Scheduled tasks list
Sorting and filtering tools are available for list of scheduled tasks. Fields are sorted in ascending and descending order. Filtration is performed according to following parameters:
- ID is task ID. Incomplete input is allowed;
- Task name. Incomplete input is allowed;
- Action is action name. Incomplete input is allowed;
- Type is the type of task execution. Only exact input is allowed;
- Last execution state is task status. Incomplete input is allowed.
To view detailed information about specific task, click on the “More” button. All actions are described in more detail in “Scheduled Tasks” tab.
On tab there is button “Schedule”, when you click on it, you go to the form for scheduling task on the object.
«Sessions» tab
It displays detailed information about connections to TRS instances of selected TRS project:

List of connections to TRS instances of project
| Field name | Description |
|---|---|
| Instance name | Name of project TRS instance to which the connection was made. It is also link to go to detailed information about specific instance. |
| Login | Name of the user who connected to the TRS instance. |
| Created | Date and time of connection to TRS instance. |
| Closed | Date and time when the connection to TRS instance was completed. |
| Connection | Connection type. Possible values are:
|
| Client | Client or web browser version is displayed depending on type of connection. |
| OS | Operating system used when connecting. |
| IP | IP-address from which connection is made. |
Sorting and filtering tools are available for all displayed fields. The fields are sorted in ascending and descending order. Filtration is performed by fields:
- Instance name;
- Login;
- Created;
- Closed;
- Connection;
- Client;
- OS;
- IP.
«Groups» tab
Tab displays list of user groups for which access to this project is granted, within the current domain:

List of TRS project groups
«Users» tab
Tab displays list of users for which access to this project is granted, within the current domain:

List of TRS project users
«Users» tab
Tab displays resources of the public cloud with which TRS project is integrated:

Public cloud resource list
Important
Tab is shown only for TRS projects that are integrated with public clouds.
| N | Action | Description |
|---|---|---|
| 1 | Create TRS Project | Creating project with «TRS» type. |
| 2 | Schedule | Execution of the selected action at specified point in time. It is also possible to repeat the action after a certain period of time. Scheduling is only possible if there are available actions. |
| 3 | Clone TRS Project | Creating copy of existing project. |
| 4 | Configure SSO | Setting up a project to receive TRS instances via SSO, receive authorization yaml files. |
| 5 | Get statistics | Getting statistics of TRS project. |
| 6 | Allocate TRS instances | Automatic assignment of free TRS instances to project users. |
| 7 | Edit project | Changing project parameters. |
| 8 | Modify Quotas | Changing project quotas. |
| 9 | Delete project | Deleting selected project. When deleted, all tasks scheduled for it are deleted along with the project. |
| 10 | Project Purposes | Getting information about user assignments to TRS instances of this project. |
Listed actions are available for execution with respect to one selected project - by selecting required action in the “Actions” field of corresponding line in the list of projects.

Individual project actions
Actions can also be triggered on multiple pre-selected projects. To do this, you need to mark required projects and select group action:

Group actions on TRS projects
To plan an action on one project, you must select «Schedule» action in the list.
To schedule task for group of TRS projects, select required projects and call “Schedule” group action.

Scheduling on group of projects
Features of work
Creation of TRS project
In the general list on control panel using “Create TRS project” button, open the project creation wizard window. Fill in the project parameters:

TRS project creating window
Information about project:
- Name is optional field, if value is empty, the name is generated automatically;
- Domain ID is project domain identifier;
- Domain name is project domain name;
- Availability zone is logical group in which the TRS instances of the project will be located;
- Operation Mode is the mode of operation of the project, set only when creating, without the possibility of its subsequent change. Possible values are:
- Standard is mode that allows only one user to work with instance at time;
- Simultaneous is mode that allows several users to work with instance at time.
- TRS instances names pattern is TRS instance name prefix, which will be the same for all TRS instances in the project. It has mandatory requirements:
- it cannot start with number and symbol
*; - it cannot be longer than 15 characters;
- it can only contain characters A-Z, a-z, 0-9,
*and-; - it must have at least one character
*(in the process of creation, asterisk symbol will be replaced with serial number of TRS instance).
- it cannot start with number and symbol
- Number of reserved instances/volumes is the number of reserved TRS instances/ TRS volumes for TRS project being created. The value must be between 0 and 999999999;
- Description is short description of the project;
- TRS volumes enabled is enabling or disabling automatic creation of TRS volumes upon user connection. It os available only for TRS projects with standard operating mode;
- Integration with public clouds enabled is enabling or disabling integration of the project with the public cloud. Integration with public clouds can be configured only when project is created, it cannot be edited in the future.

TRS project creating window
Default image:
- Allocated is selected image;
- Available is a list of all available images.

TRS project creating window
Default flavor:
- Allocated is selected flavor;
- Available is a list of all available flavors.

TRS project creating window
Default network:
- Allocated is selected network;
- Available is a list of all available networks.

TRS project creating window
Project members:
- All users is list of all available users;
- Project members is list of project users.

TRS project creating window
Project groups:
- All groups is list of all available groups;
- Project groups is list of project groups.

TRS project creating window
Configuration Drive:
Note
This tab is available only for users with the config role.
- Customization Script;
- Disk Partition;
- Configuration Drive.
Important
In particular, at this stage, a script is used to subsequently include TRS project instances in the domain.

TRS project creating window
Default key pair:
- Allocated is selected key pair;
- Available is a list of all available key pairs.

TRS project creating window
Note
Tab is available only when the integration with public clouds is enabled.
Project integration parameters with public clouds:
- Access key is public cloud access key;
- Secret key is secret key;
- Region is the region of the public cloud;
- Availability Zone is public cloud availability zone;
- Cloud type is public cloud type (AWS).
Important
For correct integration with public clouds, it is necessary to add users nova, glance, cinder, neutron with the “observer” role and current user with the “admin” role to the project.

TRS project creating window
Note
Tab is available only when the automatic creation of TRS volumes is enabled.
TRS volumes parameters:
- Volume Size (GiB) is volume size in GiB;
- Volume Type is type of volumes.
Follow directions on pages of the wizard to select the options you want. We complete creating procedure with the “Create project” button. After that, correctly created project will be displayed in the general list. Otherwise, the system will return you to the wizard window indicating reasons for the impossibility of its creation.
Scheduling actions on TRS project
Select required TRS project and call action:

Scheduled action calendar
In the wizard window that opens, select the date. Highlighted days indicate the presence of planned actions on this object for the date, and blue marks indicate their number.
To go to the next step in the field of the selected date, click on an empty area or number. In the first case, you will be redirected to the task creation window. When you click on the number, you will be immediately prompted to select the duration:

Scheduled action calendar
Specify the rest of the parameters of the scheduled action, which contain the internal tabs of the master window:

Task creation window
Let’s analyze their content in more detail:
Select an action:
Task name is the name of the scheduled action; if empty, it will be generated automatically;
Action is list of available actions on the project:
- Launch TRS instance (only for TRS projects);
- Run openstack shell command;
- Run curl request;
- Allocate TRS instances.
More information about available actions can be found in the corresponding section of documentation.
User credentials:
- Username is the login of the user planning the action;
- Password is password of the user planning the action;
- Project is working project of user planning the action.
Details:
- Type is the type of task. Following types are distinguished:
- Single task;
- Repeating task.
- Repeat, selection of values of the task execution interval. Following options are available:
- Days;
- Hours;
- Minutes;
- Working days (from Monday to Friday);
- Days of the week;
- Year.
- Repeat with interval, selection of task execution interval;
- Start date is the start date of the task in the format dd.mm.yyyy;
- Start time is the start time of the task in the format hh.mm;
- Time zone is the time zone according to which the task execution time is indicated;
- End is the conditions for terminating the task. Following conditions are distinguished:
- Never, when choosing a flag, the task becomes unlimited;
- Max number of repetitions is limiting the number of task executions;
- Date is the deadline for the task execution, set in the format dd.mm.yyyy.
TRS instance launch details:
- Instance name is an optional field; if the value is empty, the name is generated automatically;
- Instance count is number of instances to start. Possible only within the limits of available resources.
Instance users:
- All users is list of all available TRS project users;
- Instance users are users selected to be assigned to these TRS instance(s).
Instance groups:
- All groups is list of all available TRS project groups;
- Instance groups are groups selected to be assigned to these TRS instance(s).
End the procedure with the confirmation button.
Note
To return to the page with the calendar and change the date, use the «Cancel» button.
Created task is displayed in the tab «Scheduled tasks».
Cloning project
Function allows to create copy of existing project. It is available in the general list of all TRS projects. After calling the action in the window that opens, set necessary parameters:

Clone project window
Window is identical to the TRS project creating form and already contains all the parameters of cloned project. All parameters are changeable. Default name is changed to look like this «Clone of <name of cloned project>».
Complete the procedure with “Clone Project” button.
Allocation of TRS instances
Function allows to automatically distribute free TRS instances among project users. It is available in the general list of all TRS projects.

TRS instances allocation confirmation window
Getting statistics of TRS project
Function allows to get statistical information about TRS project. When performing an action, the following information is displayed:
- Number of created instances is the number of instances of all types created in the TRS project over the entire lifetime of the project;
- Number of active instances is the number of active instances of all types in TRS project at the moment;
- Number of error instances is the number of instances of all types with the “Error” status in TRS project at the moment;
- Number of created TRS instances is the number of TRS instances in the TRS project over the entire lifetime of the project;
- Number of active TRS instances is the number of active TRS instances in TRS project at the moment;
- Number of error TRS instances is the number of TRS instances with the “Error” status in TRS project at the moment;
- Number of free TRS instances is the number of TRS instances that do not have single assigned user;
- Number of occupied TRS instances is the number of TRS instances to which at least one user is assigned;
- Number of simultaneous TRS instances is the number of TRS instances that have more than one user assigned.
The action is individual and is available in the general list of TRS projects only for user with administrator rights. After calling the action, statistics are displayed in the window that opens:

TRS project statistics window
To close the window, press button «Cancel».
Getting information about assignments
Function allows to get information about user assignments to TRS instances of the project. After calling the action, the following information is displayed in the window that opens:

TRS project assignments window
To close the window, press button «Cancel».
Configuring SSO
Note
For SSO to work correctly, you need to add support for working with application authentication in keystone.
To set up SSO in Dashboard, follow these steps:
Select the domain user for which authorization data will be issued.
Note
This user must not be a domain administrator in OpenStack!
Add the user selected in step 1 to all TRS projects with which you need to work in SSO mode, with the roles admin and service.

Add user window
In the Dashboard, go to the desired project by selecting it in the upper left corner.

Selecting the active project
Go to the TRS - TRS projects tab, for the project selected at step 3, select the individual action “Configure SSO” and download the authorization file for the needed project.

SSO settings window
Repeat steps 3 and 4 for all needed projects.
Pass the resulting yaml files to the rs-client side by placing them in the
.rsclientdirectory.
Editing quotas
Function is available in the general list of TRS projects. After calling action in the window that opens, change project quotas, if necessary:

Project quotas change window
Project quotas editing form has three tabs:
- Compute;
- Volume;
- Network.
In the window that opens, change required parameters. We complete the procedure with the “Save” button.
Editing project
Function is available in the general list of all projects. After calling the action in the window that opens, set necessary parameters:

Window for changing project parameters
Information about project:
- Domain ID is project domain identifier;
- Domain name is project domain name;
- Availability zone is logical group in which the TRS instances of the project will be located;
- Operation Mode is the mode of operation of the project, set only when creating, without the possibility of its subsequent change. Possible values are:
- Standard is mode that allows only one user to work with instance at time;
- Simultaneous is mode that allows several users to work with instance at time.
- TRS instances names pattern is TRS instance name prefix, which will be the same for all TRS instances in the project. It has mandatory requirements:
- it cannot start with number and symbol
*; - it cannot be longer than 15 characters;
- it can only contain characters A-Z, a-z, 0-9,
*and-; - it must have at least one character
*(in the process of creation, asterisk symbol will be replaced with serial number of TRS instance).
- it cannot start with number and symbol
- Number of reserved instances/volumes is the number of reserved TRS instances/ TRS volumes for TRS project being created. The value must be between 0 and 999999999;
- Name is optional field, if value is empty, the name is generated automatically;
- Description is short description of the project;
- TRS volumes enabled is enabling or disabling automatic creation of TRS volumes upon user connection. It os available only for TRS projects with standard operating mode;
- Enabled is project state.

Window for changing project parameters
Default image:
- Allocated is selected image;
- Available is a list of all available images.

Window for changing project parameters
Default flavor:
- Allocated is selected flavor;
- Available is a list of all available flavors.

Window for changing project parameters
Default network:
- Allocated is selected network;
- Available is a list of all available networks.

Window for changing project parameters
Project members:
- All users is list of all available users;
- Project members is list of project users.

Window for changing project parameters
Project groups:
- All groups is list of all available groups;
- Project groups is list of project groups.
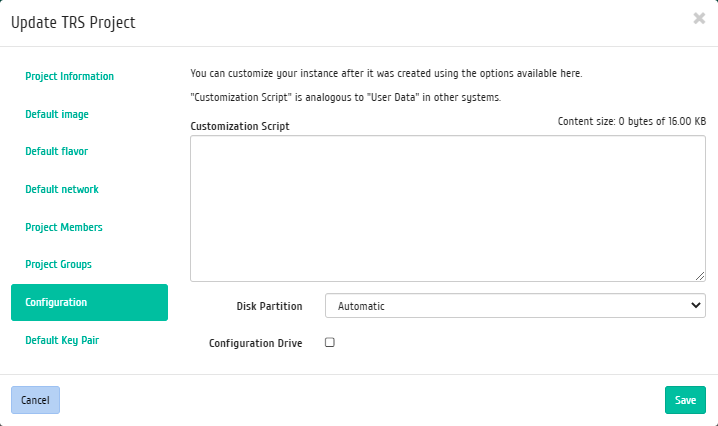
Window for changing project parameters
Configuration Drive:
Note
This tab is available only for users with the config role.
- Customization Script;
- Disk Partition;
- Configuration Drive.
Complete the procedure with “Save” button.
Group editing of projects
Function is available on the top panel in the general list of all TRS projects. Select required ones and call the action “Edit projects”. In the window that opens, set parameters for selected TRS projects:

Window for changing project parameters
Information about project:
- Description is short description of the project.

Window for changing projects parameters
Default image:
- Allocated is selected image;
- Available is a list of all available images.

Window for changing projects parameters
Default flavor:
- Allocated is selected flavor;
- Available is a list of all available flavors.

Window for changing projects parameters
Default network:
- Allocated is selected network;
- Available is a list of all available networks.

Window for changing projects parameters
Project members:
- All users is list of all available users;
- Project members, unlike private action a group action, the field does not display previously added members. This must be taken into account, since when new members are added, existing ones will be inactive.

Window for changing projects parameters
Project groups:
- All groups is list of all available groups;
- Project groups is list of project groups.

Window for changing projects parameters
Configuration Drive:
Note
This tab is available only for users with the config role.
- Customization Script;
- Disk Partition;
- Configuration Drive.
Complete the procedure with “Save” button.