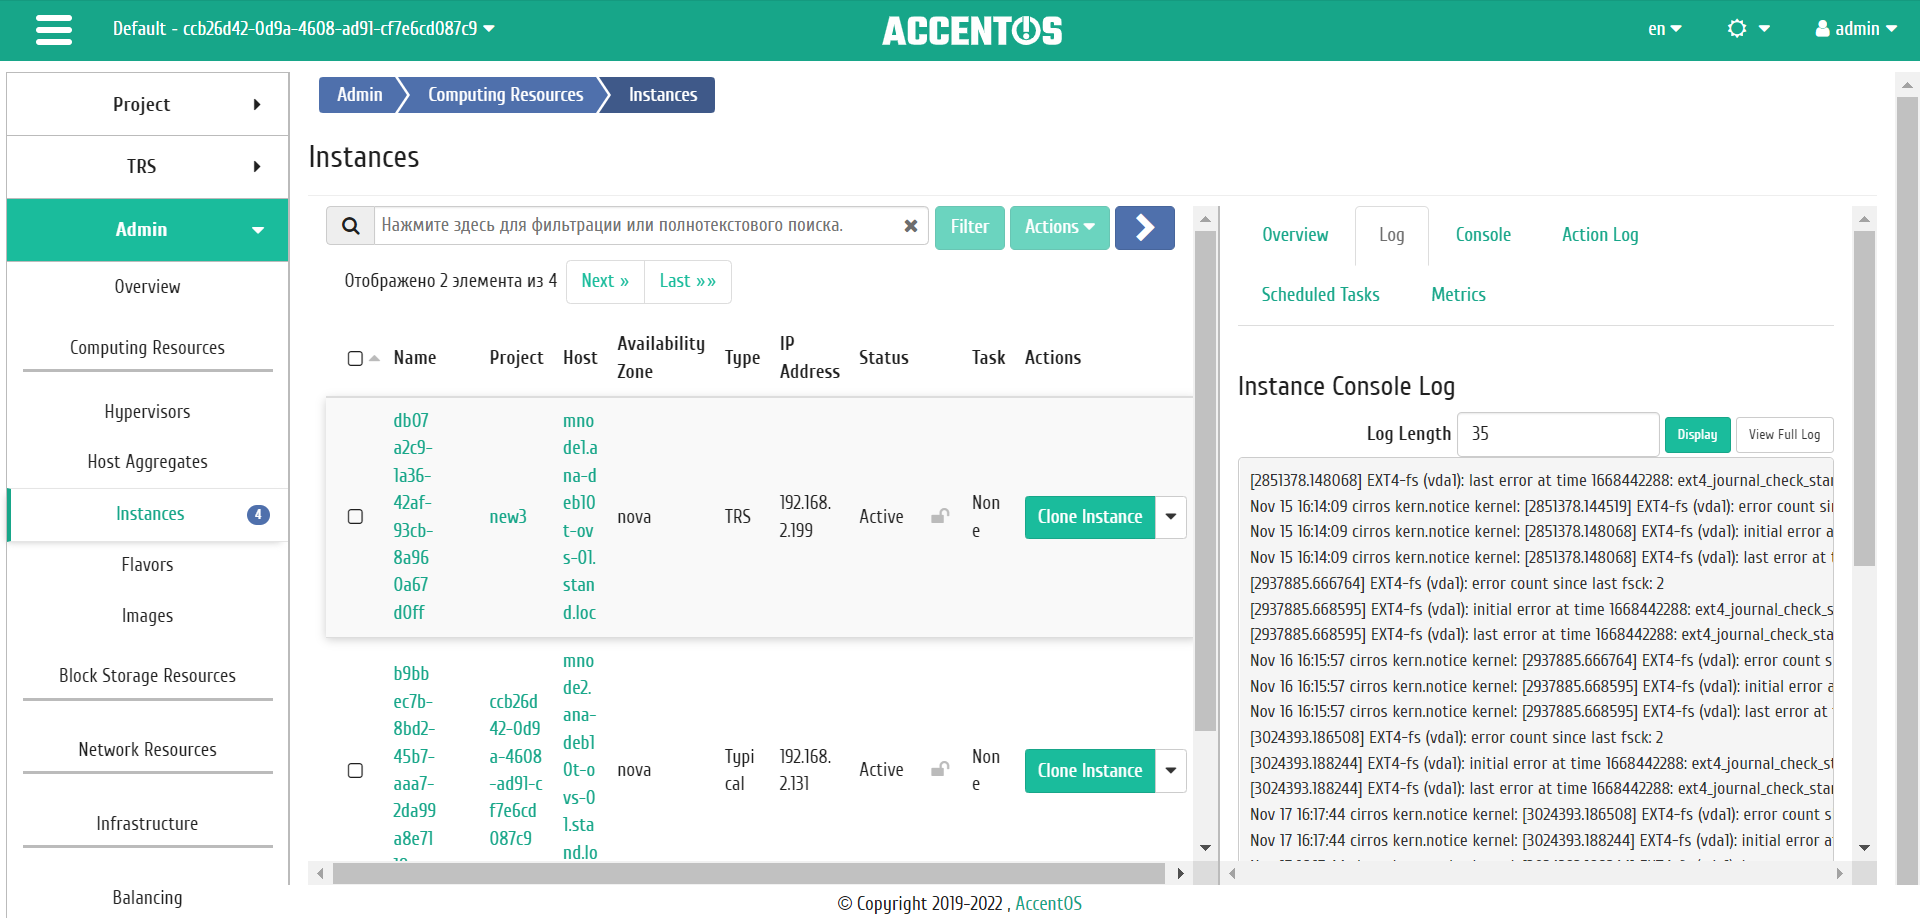
«Instances» tab
Tab is responsible for working with instances. List contains all available instances:

Instances list
| Field name | Description |
|---|---|
| Name | The instance name given by the user when it was created. Also changes in the general list and a link to go to detailed information about specific instance. |
| Project | Project that owns the instance. |
| Host | Instance’s hypervisor name. |
| Availability Zone | Instance’s availability zone. |
| Type | Instance type, set automatically when the instance is created. Following types exist:
|
| IP address | Local IP address of instance is assigned by the system automatically at the stage of creating the instance. |
| Status | Instance state as determined by Openstack services. |
| Task | Displaying the progress of the task assigned to instance. The task can be set both by the system and by the user. For example, archiving, shutdown, etc. |
Sorting and filtering tools are available for the list of instances. Sorting is available for all fields. It is possible to sort the objects marked with a check mark, as well as to sort by the blocked/unblocked machines criterion. Filtration is performed according to the following parameters:
- Project is name of instance’s project. Incomplete input is allowed;
- Instance name is name of instance. Incomplete input is allowed;
- Host is name of instance’s hypervisor. Only exact input is allowed;
- Host title is title of instance’s hypervisor. Only exact input is allowed;
- Availability Zone is instance availability zone. Incomplete input is allowed;
- Type is instance type. Only exact input is allowed;
- IPv4 address is IPv4 address of instance . Incomplete input is allowed;
- IPv6 address is IPv6 address of instance. Only exact input is allowed;
- Status is instance status. Only exact input is allowed;
- Task is task that instance is currently executing. Only exact input is allowed;
- Power State is instance power state. Incomplete input is allowed;
- Instance ID is instance identifier. Only exact input is allowed;
- Image name is name of instance image. Only exact input is allowed;
- Size is instance flavor name. Only exact input is allowed.
Time since creation and the size of one selected instance are displayed when you click on the «More» button.
Also, user can view detailed information about instance. Detailed information about the object opens in separate block on the right side of the page when you click on the instance name link. This does not close the list of objects and is displayed on the left side of the page. To close the detailed information block use the  button, to open the detailed information block you can use the
  button.
Detailed information about the instance is presented in several internal tabs.
«Overview» tab
Tab displays detailed information about the selected instance:

Detailed parameters of the instance
Note
Names of security groups, attached volumes and images are links to the pages of these objects. This allows you to navigate to the required security group, volume or image directly, bypassing the process of searching and switching between tabs. When you open links in a new tab/window, in addition to going to the details of the object, the corresponding section of the main menu opens.
«Console» tab
Tab provides access to console management of the selected instance:

Instance console
«Action log» tab
Tab displays information about the history of operations on instance:

Instance action log
| Field name | Description |
|---|---|
| Request ID | Request identifier. |
| Parent request | Identifier of the request, which is the parent of this one, for example, if an action was performed on a request from RSclient or Scheduler. If the action is performed on request from the Dashboard, then there is no parent request. |
| Action | Action name. |
| Start time | Date and time of the task start in the format: dd.mm.yyyy, hh.mm.ss. |
| User | Name of the user who initiated the action. |
| Result | Result of the action. Possible values are:
|
| Result details | Detailed description of the result. Also, if the action was performed during the execution of a scheduled task, the task identifier is indicated. |
Sorting and filtering tools are available for all displayed fields. It is also possible to sort the objects marked with a check mark. The fields are sorted in ascending and descending order. Filtration is performed on all fields.
«Scheduled Tasks» tab
Tab displays list of scheduled tasks on instance:

List of scheduled tasks
| Field name | Description |
|---|---|
| ID | Task identifier. |
| Task name | Name assigned at creation |
| Action | Scheduled action. |
| Type | Task type. |
| Last execution state | Task execution status. |
| Created Date and Time | Task creation date and time. |
| Start Date and Time | Start task performing date and time. |
Sorting and filtering tools are available for the list of instances. The fields are sorted in ascending and descending order. It is also possible to sort the objects marked with check mark. Filtration is performed according to the following parameters:
- ID is task identification number. Incomplete input is allowed;
- Task name is name of task. Incomplete input of name is allowed;
- Action is name of action. Incomplete input is allowed;
- Type is the type of task execution. Only exact input is allowed;
- Last execution task is task execution status. Incomplete input is allowed.
On the page you can also see detailed information about each task. All actions are described in more detail in the «Scheduled Tasks» tab.
On the tab there is button “Schedule”, when you click on it, you go to the form for scheduling task on the object.
«Metrics» tab
Tab displays performance data for the selected instance. Metrics presented on the page are clickable, which allows you to view each chart in detail:

Displaying instance performance statistics
Also, each of the graphs is clickable, so you can maximize and view each of the parameters of the instance:

CPU and RAM usage graph
By default, metrics are collected only for:
- percentage of CPU utilization;
- percentage of RAM utilization.
It is possible to customize the output and other metrics. Go to the tab «Integration / Monitoring» and use the function «Settings».
«Bareos templates» tab
Tab displays templates of the backup system Bareos:

List of bareos backup system templates
Sorting and filtering tools are available for the list of templates. The fields are sorted in ascending and descending order. It is also possible to sort the objects marked with check mark. Filtration is performed on all fields.
Management of templates of the backup system Bareos is available in the tab «Integration / Monitoring» using the function «Manage templates».
| N | Action | Description |
|---|---|---|
| 1 | Clone instance | Copying an existing instance with the ability to change its parameters. Parameters cannot be changed with full cloning. |
| 2 | Create image | Creating instance image. |
| 3 | Create snapshot | Creating instance image that preserves the state and data of the instance at the time of creation. |
| 4 | Confirm resize/migration | Confirming the instance migration process. |
| 5 | Console | Launching the instance console. |
| 6 | Delete instance | Deleting instance. When deleting, all tasks scheduled for it are deleted along with instance. |
| 7 | Disable port security | Disabling protection of all ports of the selected instance. The action is available only for administrator. |
| 8 | Edit instance | Changing the name, description, and security groups of instance. |
| 9 | Enable port security | Enabling protection of all ports of the selected instance, rules of security group will be applied to traffic on ports. This action is available only for administrator. |
| 10 | Hard reboot instance | Hard reboot the instance. |
| 11 | Hot plug | Editing the CPU and RAM parameters of instance. Action is only available for instances whose flavors have metadata required for hot swapping. |
| 12 | Live Migrate Instance | Moving instance in «Active» state to a user-defined compute node. |
| 13 | Log | View log of work processes and errors for this istance. |
| 14 | Migrate Instance | Changing the instance state from «Active» to «Shut Off», transferring it to user-defined compute node, and changing the status to «Active». |
| 15 | More | View additional information about instance. |
| 16 | Pause instance | Pausing instance. Instance status will change from «Active» to «Paused». |
| 17 | Rescue instance | This action will shut down instance and mount the root disk to a temporary server. Then, it will be able to connect to this server, repair the system configuration or recover your data. The rescue mode is only for emergency purpose. |
| 18 | Schedule | Execution of the selected action on the instance at a specified point in time. It is also possible to repeat the action after a certain period of time. Scheduling is only possible if there are available actions. |
| 19 | Shelve instance | Shelving the selected instance. Instance status will change from «Active» to «Shelved Offloaded». |
| 20 | Show metrics | Displaying statistics of the selected instance. |
| 21 | Shut Off | Shutting off the instance. Instance status will change from «Active» to «Shutoff». |
| 22 | Soft restart instance | Reboot the instance. |
| 23 | Start instance | Starting the selected instance. Instance status will change from «Shutoff» to «Active». |
| 24 | Unassign | Unlinking backup system template Bareos from the instance |
| 25 | Unpause instance | Unpause instance. Instance status will change from «Paused» to «Active». |
| 26 | Unshelve instance | Unshelving the selected instance. Instance status will change from «Shelved Offloaded» to «Active». |
| 27 | Update system metadata instances | Adding metadata to the instance from the image it was launched from. |
Listed actions are available for execution with respect to one selected instance - by selecting the action in the “Actions” field of the corresponding line in the list of instances.

Individual actions on instance
You can also perform actions on a group of pre-selected instances. To do this, you need to mark the required instances and select group action:

Group actions on instances
In addition, actions on instance or group of instances can be scheduled to run at a specific point in time. Also, activities can be scheduled to be performed regularly.
To schedule an action in relation to one instance, you must select an action «Schedule» in the list.

Scheduling for one instance
To schedule an action in relation to group of instances you must select needed instances and choose group action «Schedule».

Scheduling for group of instances
Features of working with instances
- Creating snapshot of instance
- Migrating instance
- Live migration of instance
- Additional information about the instance
- Instance editing
- Instance cloning
- Unassign Bareos template
- Scheduling actions on instance
- Resetting the state of instance
- Hard reboot the instance
- Updating the system metadata of instance
- Group editing instances
Creating snapshot of instance
After calling the action, you will be prompted to specify the name of the snapshot, the field is optional and will be generated automatically if the value is empty.

Snapshot creating window
Confirm the creation of the snapshot, after which the snapshot will be displayed in the tab «Images» with the status «Active».
Migrating instance
It is available in the general list of all instances. After calling the action in the window that opens, we confirm migration of the instance:

Migration confirmation window
Upon confirmation, instance will be transferred to free host.
Live migration of instance
It is available in the general list of all instances. After calling the action in the window that opens, select migration parameters:

Instance migration start window
Optionally, specify live migration options:
- Disk Over Commit is calculating the disk resources of the target host for migration, taking into account excess load.
- Block Migration is migrating an ephemeral disk of instance.
Upon confirmation, instance will be transferred to the selected host.
Additional information about the instance
Function allows to view additional information about selected instance. It is available in the general list of all instances. After calling action, additional parameters are displayed in the window that opens without the possibility of editing:

Additional information about the instance
Window is informative without the possibility of changing the indicators. Finish viewing with the “Close” button.
Instance editing
Function allows you to edit the name, description, recovery priority and evacuation time of the selected instance. It is available in the general list of all machines. After calling the action in the window that opens, set the necessary parameters:

Instance editing window
It is possible to change the security groups of the instance on the «Security Groups» tab.
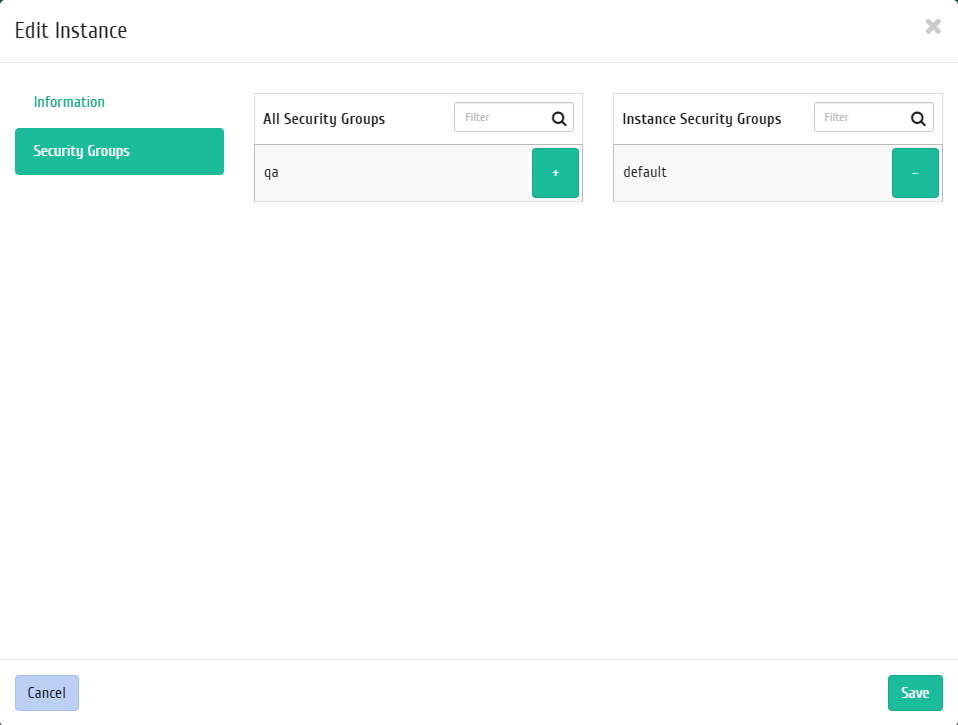
We finish the procedure with the confirmation button.
Instance cloning
Function allows to create a copy of an existing instance. It is available in the general list of all instances. After calling the action in the window that opens, set the necessary parameters:

Instance cloning window
The window is identical to the form for creating instance and already contains all the parameters of the cloned instance . All parameters are changeable. The default name is changed to look like this «Clone of <cloned instance name>».
Important
When cloning a machine, metadata Direct SCSI is inherited.
We finish the procedure with the button «Clone instance».
If the “Full cloning” option is checked, the ability to edit instance clone will disappear, a full clone of the original instance will be created by creating a snapshot and launching the instance from the created snapshot. Then the snapshot is deleted automatically. In the case of a complete cloning of instance, all instance tags, metadata, attached volumes will also be cloned. The default name is “Full clone of <name of the cloned machine>”.

Instance full cloning
Unassign Bareos template
Function is designed to remove the link between the backup system template Bareos and instance. It is available only in the inner tab “Bareos Templates”. To delete link, select the required template and call the “Unassign” action:

Unassign Bareos template window
Confirm the procedure with the “Unassign” button. After deleting the link, the template is not deleted and remains in the section «Integration / Backup».
Scheduling actions on instance
Select the required instance and call the action:

Scheduled action calendar
In the wizard window that opens, select the date. Highlighted days indicate the presence of planned actions on this object for the date, and blue marks indicate their number.
To go to the next step in the field of the selected date, click on an empty area or number. In the first case, you will be redirected to the task creation window. When you click on the number, you will be immediately prompted to select the duration:
Specify the rest of the parameters of the scheduled action, which contain the internal tabs of the master window:

Task creation window
Let’s analyze their content in more detail:
Select an action:
Task name is the name of the scheduled action; if empty, it will be generated automatically;
Action is list of available actions on the instance.
More details about available actions can be found in the corresponding section of documentation.
User credentials:
- Username is the login of the user planning the action;
- Password is password of the user planning the action;
- Project is working project of user planning the action.
Details:
- Type is the type of task. Following types are distinguished:
- Single task;
- Repeating task.
- Repeat, selection of values of the task execution interval. Following options are available:
- Days;
- Hours;
- Minutes;
- Working days (from Monday to Friday);
- Days of the week;
- Year.
- Repeat with interval, selection of task execution interval;
- Start date is the start date of the task in the format dd.mm.yyyy;
- Start time is the start time of the task in the format hh.mm;
- Time zone is the time zone according to which the task execution time is indicated;
- End is the conditions for terminating the task. Following conditions are distinguished:
- Never, when choosing a flag, the task becomes unlimited;
- Max number of repetitions is limiting the number of task executions;
- Date is the deadline for the task execution, set in the format dd.mm.yyyy.
End the procedure with the confirmation button.
Note
To return to the page with the calendar and change the date, use the “Cancel” button.
Created task is displayed in the «Scheduled tasks» tab.
Resetting the state of instance
If an error occurs in the operation of instance, function of resetting the state and resuming its normal operation is available. After calling action in the window that opens, confirm the procedure, if necessary, select the “Reboot” flag.

Instance reset state window
Note
Performing an action with the “Reboot” flag will hard reboot the instance.
After completing the state reset procedure, the instance may need some time to finalize all the parameters. Ultimately,instance is displayed with the status “Active”.
Complete the procedure with the confirmation button.
Hard reboot the instance
Function is available in the general list of all instances. After calling the action in the window that opens, confirm your choice:

Hard reboot confirmation window
After a successful reboot, the instance will be displayed in the general list with “Active” state.
All available actions, not mentioned above, are performed in their master windows with prompts or have ease of management that does not need description.
Updating the system metadata of instance
Note
By default, all image metadata is added to the instance when it is launched; subsequently, changing the image metadata does not change the metadata of running instances. If you need to update the metadata of a instance from an image, then you must use this action.
Action is available in the general list of all instances. After calling the action in the window that opens, select the source image metadata that you want to add or update to the running instance:
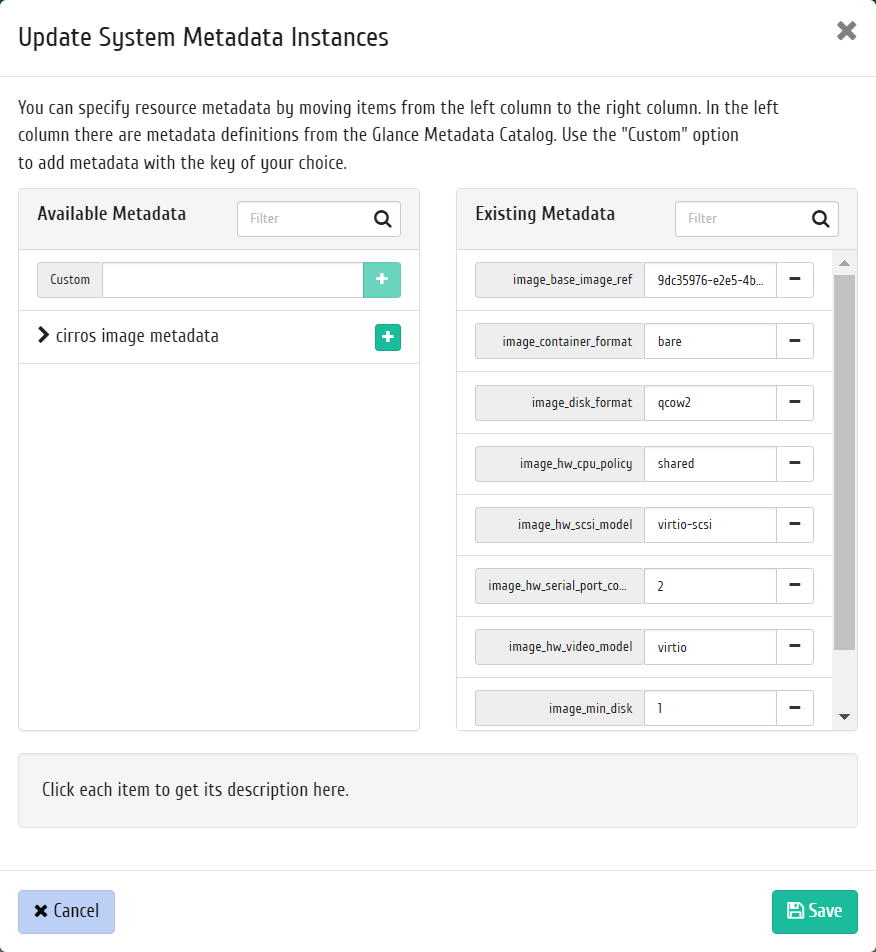
Window of updating the system metadata
Complete the procedure with the “Save” button.
Group editing instances
Function is available on the top panel in the general list of all instances. Select the required ones and call the action «Edit instances». In the window that opens, set the parameters for the selected instances:

Window for changing the parameters of instances group
Note
When choosing instances from different projects, fields with only general information will be available for editing.