VDI profiles for TRS projects:
This extension allows you to manage user connections to VMs in the context of a single TRS project. Now the Administrator can use Dashboard to flexibly limit device forwarding and some other services provided to the user within the RSclient session. This set of rules is called a VDI profile. The resulting VDI profile directly depends on the RSserver that processes the request. Using a balancer between the User and RSserver, you can give different VDI profiles, for example, if you set a rule for connecting from different networks. This is the case discussed in this documentation.
As with the standard TRS project configuration, the system is based on three key components: RSserver, RSclient and Dashboard.
With this extension, the Administrator has the ability to configure the TRS project in such a way that the User will receive a specific VDI profile, depending on the RSserver to which he connects.
- After connection, the request is processed by the balancer.
- Balancer forwards the request to one of the available RSserver.
- RSserver returns the profile specified in
/etc/aos/rsserver.conf, if the profile is not specified, RSserver returns the default profile. - Before connecting, the VM receives the user’s VDI profile depending on his source ip.
- Users connect to the VM via RSclient installed on the thin client.
Extension operation scheme:

Installing of TRS project components:
Installing RSserver:
Installing deb-package:
Install RSserver by following the documentation.
Installing pip-package:
Get superuser rights:
sudo -i
Stop all running services on all hosts:
systemctl -a stop aos-rs-* && systemctl -a status aos-rs-*
Before starting the installation, save the list of previously installed packages:
pip3 freeze > pip.lock
Migrating an old version of RSserver:
mv /usr/lib/python3/dist-packages/rs_server ~/rs_server_old
Install the new pip package (if it starts installing dependencies that are not cached in the local environment, abort the process immediately):
pip3 install rs_server-1.16.*-cp37-cp37m-linux_x86_64.whl
Make sure you are using the new version:
python3 -c "from rs_server.core.helpers import check; print(check())"
# > no err
python3 -c "from rs_server.settings import CONF; print(CONF.broker_api.vdi_profiles_enabled)"
# > False
python3 -c "from rs_server.settings import CONF; print(CONF.broker.default_vdi_profile)"
# > python3 -c "from rs_server.settings import CONF; print(CONF.broker.default_vdi_profile)" # no error
VDIProfiles.PROFILE_1
python3 -c "from rs_server.core.helpers import parse; print(parse())"  # no err
Apply migrations (only once per controller):
openstack aos db migrate -n rs_server
Change the version in bin files:
sed -i "s/1.16.*/1.16.*/g" /usr/bin/aos-rs-*
Restart all related services:
systemctl -a restart aos-rs-* && systemctl -a status aos-rs-*
Configuration:
In the
/etc/aos/rs_server.conffile, make sure you have VDI profiles enabled, and also specify the default profile:vdi_profiles_enabled = True default_vdi_profile = 1..8
Installing RSclient:
Install the package:
apt-get install ~/vncm-client_0.5.6-7-agent_amd64.deb
Run the setup script:
configure-vncm-client.sh
Enter the name of an existing user from which to connect (for new users, the default settings are already set).
Wait until the setting is complete.
Installing Dashboard:
Installing deb-package:
Install Dashboard by following the documentation.
Installing pip-package:
Important
This installation procedure only applies if Dashboard is already installed as part of the system packages (dist-packages). Make sure this condition is met before proceeding.
Get superuser rights:
sudo -i
Before starting the installation, save the list of previously installed packages:
mkdir -p /tmp/rollback/dashboard
pip3 freeze > /tmp/rollback/dashboard/pip_before.txt
Stop all associated services with Horizon services:
systemctl stop apache2 nginx dashboard-uwsgi memcached
systemctl status apache2 nginx dashboard-uwsgi memcached
Transfer the deb-version of the Dashboard:
sudo mv /usr/lib/python3/dist-packages/dashboard /usr/lib/python3/dist-packages/dashboard-old
Install the new pip-package (if it starts installing dependencies not cached in the local environment, abort the process immediately):
pip3 install /tmp/dashboard-1.16.*.tar.gz
Make sure that python will use the new Dashboard:
python3 -c "import dashboard; print(dashboard.__file__)"
Save the list of installed packages after installation to be able to roll back changes:
pip3 freeze > /tmp/rollback/dashboard/pip_after.txt
Collect static files:
python3 /usr/share/openstack-dashboard/manage.py collectstatic -c
Perform file compression:
python3 /usr/share/openstack-dashboard/manage.py compress
Restart all related services:
systemctl restart apache2 nginx dashboard-uwsgi memcached
systemctl status apache2 nginx dashboard-uwsgi memcached
Configuration:
Add a field to the /etc/aos/dashboard.conf configuration file (to display the RSclient settings tab):
group_policies_enabled = True
Creating a TRS-project and TRS-machine via Dashboard:
- Go to the
TRS/TRS Projectssection, create and configure the project, assign users. - Fill in the VDI profiles. The default is Profile 1.
- Go to
TRS/TRS Instances, create a virtual machine and assign security group.
Sample connection script:
#!/bin/bash
    set -x
    exec 2> ~/.rsclient/connect_error.log
    exec 1> ~/.rsclient/connect.log

    connect_timeout=30

    ipraw=$RSC_VM_IP
    user=$RSC_USER
    pass=$RSC_PASSWORD
    vncm_admx=$RSC_GROUP_POLICY_TEMP_PATH
    web_admx=$RSC_ALLOWED_URLS_TEMP_PATH

    echo 1 > ~/.vnc/.vncm_progress
    echo "# Starting a connection ..." > ~/.vnc/.vncm_status

    connect() {
    echo 20 > ~/.vnc/.vncm_progress
    echo "# Starting a connection to a virtual machine" > ~/.vnc/.vncm_status
    if [[ ! -z $(ps -aux | grep vncviewer | grep -v grep) ]]; then
        /bin/sh -c "zenity --info --text='vnc is already running'"
        exit 0
    fi

    ip=$(nslookup "$ipraw" | grep "name = " | sed 's|.name = ||g')

    if [[ ! "$@" =~ 'magic_number_for_sso_mode' ]]; then
        ip=$ipraw
        # check if pass need change
        passexp=$(sshpass -v -p "$pass" ssh -o StrictHostKeyChecking=no "$user@$ip" 'whoami' 2>&1)
        if [[ $passexp =~ expired ]]; then
        zenity --error \
        --text="You need to change your password"
        echo 100 > ~/.vnc/.vncm_progress
        echo "# Ending the connection" > ~/.vnc/.vncm_status
        off-client.sh
        exit 0
        fi
        ssh_con="sshpass -p '$pass' ssh -tt -o StrictHostKeyChecking=no"
    else
        ssh_con="ssh -tt -o StrictHostKeyChecking=no"
    fi

    myip=$(sshpass -p "$pass" ssh -o StrictHostKeyChecking=no "$user@$ip" "echo \$SSH_CLIENT | sed 's| .||g'")

    userhome=$(eval $ssh_con "$user@$ip" env | grep HOME | sed 's|HOME=||g')
    userhome=$(echo "$userhome" | rev | cut -c 2- | rev)

    echo 50 > ~/.vnc/.vncm_progress
    echo "# Starting vnc connection" > ~/.vnc/.vncm_status

    eval $ssh_con "$user@$ip" "loginctl enable-linger $user"
    eval $ssh_con "$user@$ip" "systemctl --user daemon-reload"

    if [[ $(cat $HOME/.vnc/default.tigervnc | grep LocalhostForSSH=1 | grep -v -E "^ *#") ]]
    then
        eval $ssh_con $user@$ip "systemctl --user stop vncserver"
        eval $ssh_con $user@$ip "systemctl --user start vncserver_sock"
    else
        eval $ssh_con $user@$ip "systemctl --user stop vncserver_sock"
        eval $ssh_con $user@$ip "systemctl --user start vncserver"
    fi

    try=0
    while [[ ! $ok ]]; do
        ok=$(eval $ssh_con "$user@$ip" 'ps -aux | grep /usr/bin/Xvnc | grep -v grep')
        sleep 1
        try=$(expr $try + 1)
        if [ "$try" = $connect_timeout ]; then
        zenity --error \
        --text="Failed to connect to the virtual machine. Try connecting again or contact your system administrator."
        echo 100 > ~/.vnc/.vncm_progress
        echo "# Завершение подключения" > ~/.vnc/.vncm_status
        off-client.sh
        exit 0
        fi
    done

    loginctl enable-linger "$USER"
    systemctl --user daemon-reload

    sshpass -p $pass scp -o StrictHostKeyChecking=no $vncm_admx $user@$ip:/var/tmp/.vncm/VNCm.admx
    sshpass -p $pass scp -o StrictHostKeyChecking=no $web_admx $user@$ip:/var/tmp/.vncm/WEBfwd.admx
    eval $ssh_con $user@$ip 'chmod 666 /var/tmp/.vncm/*.admx'

    eval $ssh_con $user@$ip 'mkdir -p /tmp/share/'
    eval $ssh_con $user@$ip 'chmod 777 /tmp/share/'

    # wait for agent to start
    unset ok
    while [[ ! $ok =~ "OK" ]]
    do
        eval $ssh_con -q $user@$ip [[ -S /tmp/vnc.sock ]] && ok="OK" || ok="NO";
        sleep 1
    done

    if [[ $(cat $HOME/.vnc/default.tigervnc | grep LocalhostForSSH=1 | grep -v -E "^ *#") ]]
    then
        passes=$passes" -L 127.0.0.1:33333:$userhome/.vnc/vncm.sock"
    fi

    eval $ssh_con -R $userhome/.pcscd.comm:/var/run/pcscd/pcscd.comm $user@$ip &
    eval $ssh_con -R $userhome/.cups.sock:/var/run/cups/cups.sock $user@$ip &

    echo 100 > ~/.vnc/.vncm_progress
    echo "# vnc connected ..." > ~/.vnc/.vncm_status
    if [[ "$@" =~ '--use-quictun' ]]; then
        if [[ $(cat "$HOME/.vnc/default.tigervnc" | grep LocalhostForSSH=1 | grep -v -E "^ *#") ]]; then
        systemctl --user start vncm-quic-server@$myip.service
        systemctl --user start vncm-socat-client.service
        eval $ssh_con "$user@$ip" "systemctl --user start vncm-quic-client@$myip.service"
        eval $ssh_con "$user@$ip" "systemctl --user start vncm-socat-server.service"
        unset ok
        while [[ ! $ok ]]; do
            ok=$(eval $ssh_con "$user@$ip" 'ps -aux | grep tcp:localhost:2322 | grep -v grep')
            sleep 1
        done
        eval $ssh_con "$passes" "$user@$ip" &
        unset ok
        while [[ ! $ok =~ '127.0.0.1:33333' ]]
        do
            ok=$(ps -aux | grep 127.0.0.1:33333 | grep -v grep)
            sleep 1
        done
        /usr/bin/vncviewer $HOME/.vnc/default.tigervnc localhost:33333
        else
        echo "ERROR: --use-quictun need LocalhostForSSH=1"
        fi
    else
        if [[ $(cat "$HOME/.vnc/default.tigervnc" | grep LocalhostForSSH=1 | grep -v -E "^ *#") ]]; then
        systemctl --user start vncm-socat-client.service
        passes="$passes -R 3240:localhost:3240 -R 5005:localhost:5005 -R 5007:localhost:5007 -R 5008:localhost:5008 -R 6566:localhost:6566 -R 2322:localhost:22"
        eval $ssh_con "$passes" "$user@$ip" &
        eval $ssh_con "$user@$ip" 'systemctl --user start vncm-socat-server.service'
        unset ok
        while [[ ! $ok =~ '2322:localhost:22' ]]; do
            ok=$(ps -aux | grep 2322:localhost:22 | grep -v grep)
            sleep 1
        done
        /usr/bin/vncviewer $HOME/.vnc/default.tigervnc localhost:33333
        else
        /usr/bin/vncviewer "$HOME/.vnc/default.tigervnc" "$ip:1"
        fi
    fi
    }

    (
    (
    while [[ $progress != 100 ]]; do
        progress=$(cat ~/.vnc/.vncm_progress)
        status=$(cat ~/.vnc/.vncm_status)
        echo "$progress"
        echo "$status"
        sleep 1
    done
    ) | zenity --progress \
        --title="VNCM" \
        --text="Starting a connection ..." \
        --percentage=0 \
        --auto-close \
        --no-cancel || pkill connect.sh
    ) & connect "$@"
Important
The connection script can use variables that will be automatically changed to real values during the process:
$RSC_VM_IP– VM address.$RSC_USER– username for authentication.$RSC_PASSWORD– password for user authentication.$RSC_GROUP_POLICY_TEMP_PATH– local path to temporary file with group policies.$RSC_ALLOWED_URLS_TEMP_PATH– local path to temporary file with allowed URLs.
Sample Group Policies:
---
# policies
policy:
scanner: true
printer: false
netfs: false
webcam: true
audio: true
microphone: true
smartcard: false
usb:
- device_1:
    vid: 0
    pid: 0
...
Sample of allowed URLs:
$RSC_CLIENT_IP|{
    "rules": [
        {
        "active": true,
        "conditions": [
            {
            "id": 1739955810043,
            "request": {
                "redirect": "http://$RSC_CLIENT_IP/v1/urls/[example.com$1]",
                "search": "REGEX",
                "value": "https?://example.com(.*)"
            }
            }
        ],
        "description": "Redirect с example.com",
        "enableNotifications": true,
        "id": 1739955654113,
        "name": "example.com"
        }
    ]
}
Important
Allowed URLs can use a variable that will be automatically changed to the actual value during the process:
$RSC_CLIENT_IP– IP address of the client machine.
Installing and configuring the balancer:
The TRS-project system utilizes a HAProxy based load balancer to provide fault tolerance and load balancing.
Virtual Machine (VM) Requirements:
- The VM must have two network interfaces.
- Configure routing for accessing VMs from other networks. It is recommended to avoid the situation with two default gateways or use routing policy.
Installing HAProxy:
Install HAProxy using the package manager:
apt install haproxy
If access to repositories is limited, use a pre-built image with the HAProxy package already installed.
Configuring:
Sample configuration file:
global
    log /dev/log local0
    log /dev/log local1 notice
    chroot /var/lib/haproxy
    stats socket /run/haproxy/admin.sock mode 660 level admin
    stats timeout 30s
    user haproxy
    group haproxy
    daemon

defaults
    log global
    mode http
    option httplog
    timeout connect 5s
    timeout client  50s
    timeout server  50s

frontend trs_proxy
    bind 10.40.14.151:9365
    acl from_vm src 10.40.15.0/24
    acl from_tk src 10.40.251.0/24
    use_backend backend_vm if from_vm
    use_backend backend_tk if from_tk
    http-request deny if !from_tk !from_vm

backend backend_vm
    balance roundrobin
    server srv1 10.40.13.11:9365 check
    server srv2 10.40.13.12:9365 check

backend backend_tk
    balance roundrobin
    server srv3 10.40.13.13:9365 check
Once the configuration is set, restart HAProxy to apply the changes:
systemctl restart haproxy
Important
Make sure that all RSservers in the same group use the same /etc/aos/.rs_server_secret_key key.
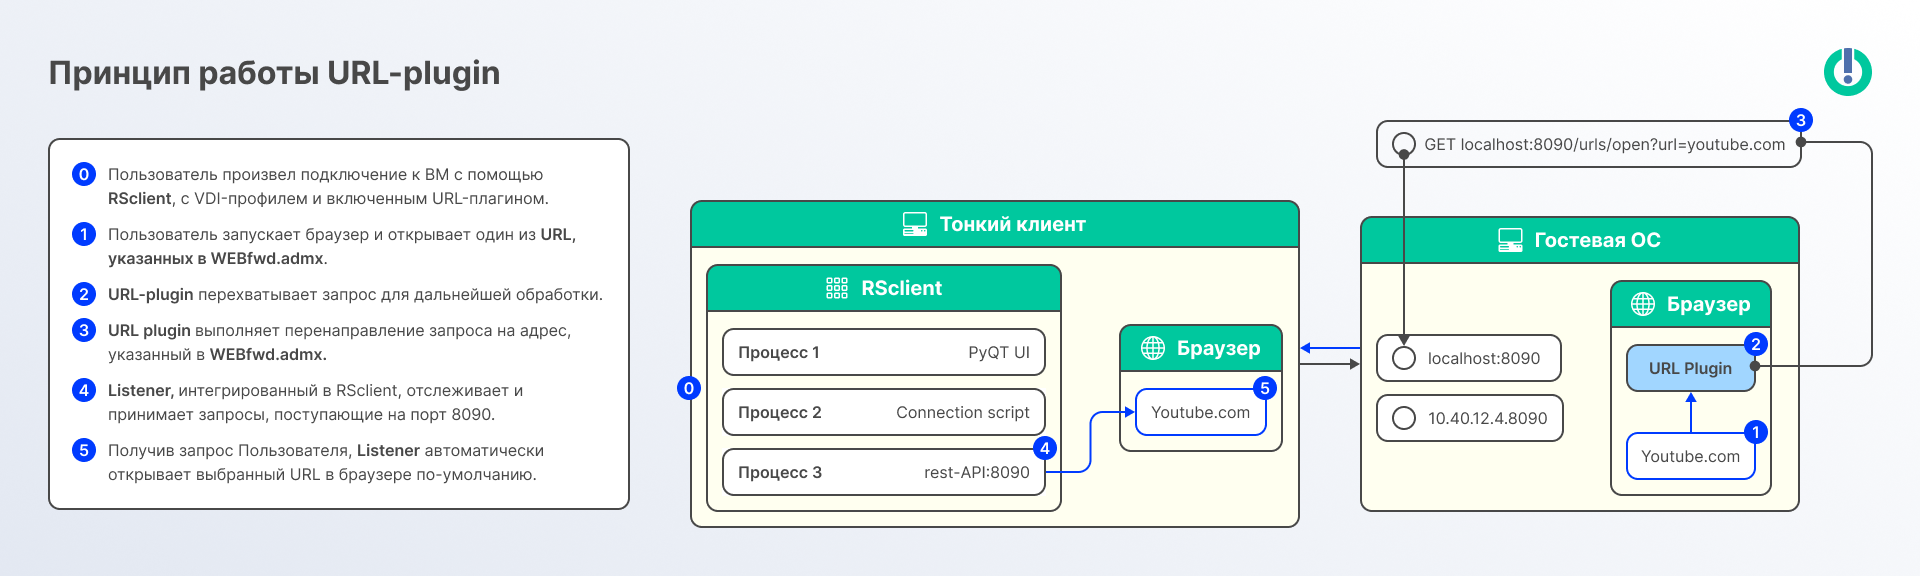
URL-plugin:
URL-plugin is an extension for Chromium-based browsers that provides control over URL transitions.
When a user tries to visit a URL, the plugin checks if the URL is in the list of allowed URLs. If the URL is allowed, the plugin automatically closes the tab on the VM and opens it on the thin client in the local browser.
This allows traffic to be redirected to the user’s device, providing security and control over access to external resources.
Installing URL-plugin:
Important
Make sure that both the thin client and the VM have a Chromium engine browser installed.
Файл WEBfwd.admx:
Important
Make sure that the RSclient settings section of your TRS-project specifies the allowed URLs.
Allowed URLs are passed to the VM using the connection script:
#sshpass -p "$pass" scp "$RSC_ALLOWED_URLS_TEMP_PATH" "$user@$ipraw:/var/tmp/.vncm/WEBfwd.admx"
Installing the URL-plugin extension:
On the VM, open a browser, enable Developer Mode and install the extension by specifying the path to it.